Administration
The administration area includes company-wide configurations, such as policies regarding airport transfers, minimum stays, cancellations, and payments. This is also where you can set up user information for access to C-Breez.
Top Tip
 The World icon next to a Data entry field in any part of the C-BREEZ portal means that the entered data will be visible to the guests in the Booking Engine.
Organization Details
Administration details apply to the whole organization, not to the specific resort. Examples include policies related to the following:
- airport transfer
- minimum stay
- cancellation
- payment
To set up your organization details:
-
Click on Administration > Organization Details.
-
In the Organization section, click the pencil icon or the editable fields, enter the organization name, email, phone number, and address, and then click Save.
-
In the Main Contact section, click the pencil icon or the editable fields, enter the name, job title, email address, and phone number of the organization's main contact person, and then click Save.
-
(Optional) The email field is populated when C-Breez sets up your account. However, you can change the account administrator's email address or password at any time.
- To update the account administrator's email address: in the Admin Account section, click the pencil icon or the editable field, update the account administrator's email address, and then click Save.
- To change the account administrator's password: in the Admin Account section, click the link, enter a new password, and then click Save.
-
In the Airport Transfer section, click the plus icon, enter the name and description of an airport for which you have transfer service, and then click the check mark. You can repeat this process for as many airports as required. A transfer policy must exist before you can make a booking. The Airport Transfer details are displayed in the Booking Engine on the Search results and Summary pages, and are sent to the Guest in the Confirmation email, under the Flight Details.
-
In the Age Group section, define unique age groups for guests. For example, you might create a group for teens (ages 13-17) and a group for children (ages 3-12). For more information see Understanding Age Groups.
-
Add a new age group - Click the plus icon, enter a descriptive Name and a numeric age in the From and To fields. Click the check mark to create the new age group. Note: The To field is optional.
-
Edit an existing age group - Click the pencil icon and make changes to the Name field. Click the check mark to save the changes. Note: Only the Name field can be edited so if you need to make changes to the age fields (From and To) you must delete the age group by clicking the trash can icon and then create a new age group with the correct age range.
-
Delete an existing age group - Click the pencil icon and then click the trash can icon. Click OK on the confirmation prompt.
-
-
In the Minimum Stay Policy section, click the editable field to enter a number of days, and then click Save. Only one minimum stay policy is defined here because the default minimum stay policy can be overridden in the pricing area under Rate Plans.
-
In the Cancellation Policies section, set up rules for your cancellation policies. For more information on how cancellation policies work in C-Breez, see Understanding Cancellation Policies. You can do the following:
-
Add a cancellation policy - Click the plus icon, enter a Name and Description, and click Save. Your new cancellation policy has been created. Create the year round default and exception rules.
- Add year round defaults - Click Add Rule, enter the number of Days prior to arrival that this rule is in effect, select the Charge type (percentage, amount, or nights) and enter an associated value, and then click Save. Add additional rules, as needed. You can also:
- Click Remove to delete an existing rule.
- Add exceptions - Click Add Rule Set, enter a Name for the rule, along with a numeric day and numeric month to define the Period From and Period To dates during which this exception will be applied, and click Save. If no value is entered for Year, then the exception will be reoccur each and every year going forward. Inversely, if a value for a Year is entered, then this exception will only apply to the year specified. Specifying a year is not mandatory and is entirely optional. Add additional exception periods, as needed.
In the appropriate exceptions row, click Add Rule. In the Days field enter the number of days prior to arrival that this rule is in effect. Next, select the Charge type (percentage, amount, or nights) and enter an associated value, and then click Save. Add additional rules, as needed. You can also:
- Click Remove to delete an entire exception period along with its associated rules.
- Click Rename to update the name of the exception period.
- Click Change Period to alter the period dates for this exception.
- Add year round defaults - Click Add Rule, enter the number of Days prior to arrival that this rule is in effect, select the Charge type (percentage, amount, or nights) and enter an associated value, and then click Save. Add additional rules, as needed. You can also:
-
Clone a cancellation policy - Click the clone icon, enter a Name for the new cancellation policy, and click Save. Your cancellation policy has been duplicated. Add, remove, or edit rules relating to year round defaults and exceptions.
-
Edit a cancellation policy - Click the pencil icon or the editable fields, modify the Name and/or Description, and click the check mark. Your cancellation policy has been edited. Add, remove, or edit rules relating to year round defaults and exceptions.
-
Remove a cancellation policy - After you click the pencil icon or the editable fields, click the remove icon to remove the cancellation policy from the organization details page. A confirmation dialog is presented before the policy is removed. Enter a reason for the policy's removal, and click Yes.
-
-
In the Payment Policies section, set up your payment policies.
-
Add a payment policy - Click the plus icon and enter a Name and Description. Then select whether the Deposit is the full amount, a fixed amount, or a number of nights and enter the Deposit Amount value. Select Fixed Amount for Installments if allowed and then enter the Monthly Installment Amount, if applicable. In Final Payment Due enter the days prior to arrival that the full amount is due, and then click the check mark. If the amount is due after arrival, input a negative number. For example, a value of -30 indicates that the amount is due 30 days after arrival.
-
Add exceptions - Click Add Exception to create an exception to the payment policy, if applicable. For example, this payment policy may not be honoured during holiday weekends. Enter a Name for the exception, along with a numeric day and numeric month to define the Period From and Period To dates during which the exception will be applied. Click the type of Deposit to be charged during the exception period (Full Payment, Fixed Amount, or Number of Nights.)
-
If Fixed Amount is selected, you will be prompted to enter the Deposit Amount and designate if Installments will be allowed by clicking the Fixed Amount button and entering the Monthly Installment Amount. If installments are not allowed for the exception, leave None selected. In Final Payment Due enter the days prior to arrival that the full amount is due.
-
If Number of Nights is selected, you will be prompted enter the number of nights for which the deposit must be made at the time of booking. Next, designate if Installments will be allowed by clicking the Fixed Amount button and entering the Monthly Installment Amount. If installments are not allowed for the exception, leave None selected. In Final Payment Due enter the days prior to arrival that the full amount is due.
-
Click Save to add the exception to the payment policy.
-
Edit a payment policy - Click the pencil icon or the editable fields, modify any of the fields, and then click the check mark to save your changes.
- Remove a payment policy - After you click the pencil icon or the editable fields, click the remove icon to delete the payment policy from the organization details page.
-
-
In the Booking Engine section, click the pencil icon or the editable fields. The contract drop down menu shows all the Distribution Channels that have been created. Select a Distribution Channel to be used on the booking engine. Add a prefix for the reservations that come in from the booking engine. Enter the company's trading name, favicon URL, Google Analytics tracking code, and Google Tag Manager code. Finally, click Save.
To configure the Google Analytics or Google Tag Manager integrations, see the article on analytics.
The sections for IBS Settings and RDP Host are configured by C-Breez. Because there is nothing for you to configure, the fields are read-only in these sections.
- In the Trip Advisor section, you can enter the Contact information (name, email and phone number), Technical Contact information (name, email and phone number), and Credentials (username and password) for the Trip Advisor integration. All fields are required. You can also view the TripAdvisor API url.
Understanding Age Groups
Age groups are created at the Organization level and then applied to individual resorts and/or hotels, as required. Define groups for various age ranges such as children, teenages, toddlers, and even senior citizens, as applicable to specific resorts and hotels.
- Each resort can have a different number of age groups, including none.
- Age groups included in a single resort cannot overlap.
- There is no need to define an adult age group, as any age not falling inside existing age groups will be treated as an adult.
- If a resort caters to a specific age group of adults, you can create a group for that unique age range. For example, adults over 55 or adults over 21.
- You can add or remove age groups for individual hotels within a resort.
Understanding Cancellation Policies
Cancellation policies include year round defaults. Year round defaults define what will be charged for a cancellation that occurs a specified number of days prior to the arrival date. For each time period, the type of charge can be a percentage, an amount, or a number of nights. A combination of types of charges is not possible. For example, you cannot have 25% and $50.00. However, your set of rules can have differing types. For example, one rule might say cancelling 45 days prior to arrival will incur a 25% charge, and a second rule might say cancellation 30 days prior to arrival will incur a $500 charge. You can add as many rules to the year round defaults as you need.
You can also add exceptions to the cancellation policy. For example, due to higher demand over the Christmas & New Year's holidays, you could specify that there is 100% charge if the cancellation is within 30 days prior to arrival for bookings from December 23rd through January 3rd. This exception can also have multiple rule sets.
Cancellation policies are brought into the Distribution Channel.
Top Tip
A single policy can be in multiple Distribution Channels. The name of the cancellation policy and its corresponding description will be displayed in the booking engine, and may also be visible in customer-facing areas such as in confirmation messages.
Even though the rules drive the calculations, they are not visible to the public, so the description is important for helping other internal users understand what the policy does.
Understanding Payment Policies
Payment policies can be brought into multiple Distribution Channels. Like cancellation policies, the name and description of payment policies are public-facing. Payment policies are company-wide, not for each hotel.
Each payment policy specifies details about the deposit taken at booking, which can be the full payment, a fixed amount, or a number of nights. Payment policies with a deposit based on a fixed amount or number of nights can optionally include a fixed monthly installment amount, and also include the number of days prior to arrival that the outstanding balance is due. An installment balance is due every 30 days based on the booking date. The installment due date is not relative to the month, the middle of the month, or other time period.
For example, consider a payment policy with $500 due at the time of booking, a default installment amount of $1,000, and a balance due 25 days prior to arrival. If this payment policy was used for a $5,000 booking on May 22nd for an arrival date of September 10th, the client would pay $500 at the time of booking, leaving a balance of $4,500. Then, every 30 days a $1,000 installment would be due, like so:
- Pay $1,000 on June 21st, leaving a $3,500 balance.
- Pay $1,000 on July 21st, leaving a $2,500 balance.
- Pay $2,500 on August 16th because this is 25 days prior to arrival so the remaining balance is due.
If a tour operator has a credit, you can use a negative value in the days before arrival field. You can combine this with values of 0 in the amount taken at booking and the default installment amount fields to only charge after the arrival date. For example, a value of -30 in days before arrival field indicates that payment isn't due until thirty days after the arrival.
Users
Under Administration > Users, you can add new users, search for users, see a list of existing users, edit the details of an existing user, or delete an existing user.
A user has an email address, name, surname, password, and one or more roles.
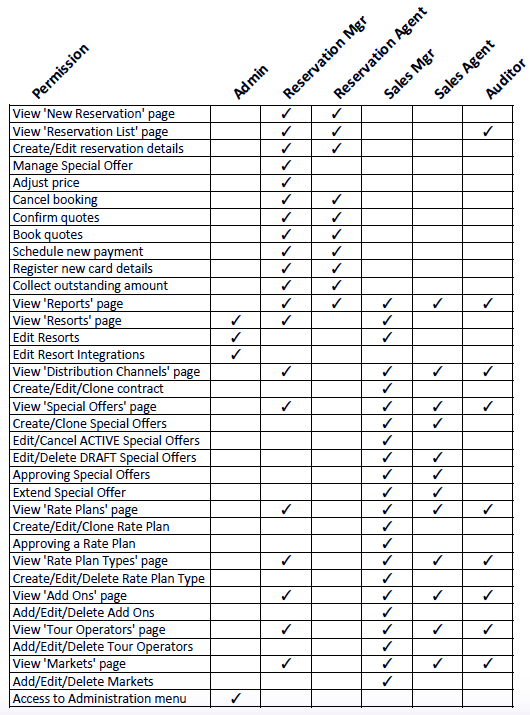
Roles
In the C-Breez portal, there are six Roles, each with a different set of permissions.
- Administrator
- This role has the permission to administrate the basic organization information and resort details including resort integrations. An administrator can also create new and delete existing user accounts.
- Reservation Manager
- This set of permissions is focused on managing bookings. The reservation manager can create, edit and otherwise manage reservations and download booking reports. This role can also view pricing elements such as Special Offers, Rate Plans, etc. but cannot edit them.
- Reservation Agent
- This role is limited to managing bookings with the exception of managing a special offer within a booking or adjusting the booking price. All other parts of the portal are off limits to this role.
- Sales Manager
- The permissions for this role are focused on managing the pricing elements of the organization or resort. The sales manager can create, edit and otherwise manage distribution channels, special offers, rate plans, rate plan types, add-ons, tour operators and markets. This role can download booking reports but cannot view the reservation page or list.
- Sales Agent
- The permissions for this role are mainly limited to viewing the pricing elements of the organization or resort. The sales agent can view the distribution channels, special offers, rate plans, rate plan types, add-ons, tour operators and markets. This role can also create, approve and extend special offers and edit the draft version only of special offers.
- Auditor
- The permissions for this role are limited to viewing all the elements of the portal including reservations and pricing. The auditor can view all the pages except Resorts and Administration, but cannot edit anything.
User Permissions Table
API Keys
Application Programming Interface (API) keys can be created for the booking engine. An API key provides access to the Booking Engine API. API keys are read-only and displayed only once. If you lose the key, you'll have to revoke it and generate a new one.